This section aims to get you up and running using Naked Objects, using a very simple application as an example. Although this section will be of particular interest to Java programmers it has been written with enough detail that developers proficient in other languages and other software professionals can make sense of it. We will discuss what software is required, where to obtain it, and then look at how to code a simple application.
For this example we will work with basic command-line tools rather than with an IDE (Integrated Development Environment). This enables us to see the exact steps needed to write, compile and run the application, which you can then apply to your specific IDE.
Before we start you should create a working directory where you can
place your files. For this example we will use a directory called
project created off the root of our file systems:
C:\Project in Windows and /project in
Unix.
To understand the principles of coding Naked Object applications we will now look at a very simple, but complete, application. The requirement is for a system that allows us to quickly organize employees into teams so they can work on specific projects. When a project is set up, distinct skills are identified, and individuals are assigned to the project based on those requirements.
This will require three classes whose objects will represent the projects, the employees and the roles (a role being a combined set of skills). These classes will need to relate to each other: a project identifying its required roles and each role identifying the individual who is to join the team.
The classes we will define for this application, therefore, are:
Employee, Role and Project.
Each Project object will hold a collection of
Role objects and each Role will hold a
reference to an Employee object.
We start by defining the classes for the three types of
object. For each class we need to create a .java file and
within it declare the class as an extension to the
AbstractNakedObject class.
Start the three classes as follows:-
Project.java

import org.nakedobjects.object.AbstractNakedObject;

public class Project extends AbstractNakedObject {
}

Role.java

import org.nakedobjects.object.AbstractNakedObject;

public class Role extends AbstractNakedObject {
}

Employee.java

import org.nakedobjects.object.AbstractNakedObject;

public class Employee extends AbstractNakedObject {
}
Now we consider what fields each
object should have. First we add fields that allow
the user to identify the different objects (e.g. so we can see
that one object represents Dave and the other represents John). Next we
add fields that describe any relationships between the objects (e.g.
every role is performed by an employee so a Role object
will need a field to reference an Employee object).
Taking the simplest object first, an Employee need
only have a name as this should be enough to distinguish it. To store
this name we add a private final variable, of the type
TextString, called name to the
Employee class. A TextString value object
stores simple textual information. The variable is marked as final as it
is a composite part of the Employee and should never be
replaced. As it is final we initialize it as soon as it is declared
(alternatively, this could be done within the constructor). To make this
field available to other objects, and to the framework so it can be
displayed, we add an accessor method that will return the reference to
the value object.
Employee.java

import org.nakedobjects.object.AbstractNakedObject;
import org.nakedobjects.object.value.TextString;

public class Employee extends AbstractNakedObject {
  private final TextString name = new TextString();

  public TextString getName() {
    return name;
  }
}
Next, we do a similar thing for the Role class as this
also requires a name. In addition to this basic data we also need to hold
a reference to the Employee object that this role is being
performed by. To do this we declare a private field of the type that we
want to keep a reference to; in this example it needs to be an instance of the
Employee class. Like the value object, we also need to
make this field available so we define a standard pair of accessor
methods (getEmployee and
setEmployee).
Inside these two methods you will see two
necessary calls that keep the object current in the object store (our
link to a persistence mechanism) and in any other views of the same
object (on both the local and any remote clients). In the
set... methods for any reference objects (as opposed to the
value objects we saw earlier) the objectChanged method
should be invoked. This notifies the object store that this object needs
to be stored away again and also notifies any other views showing this
object so they can refresh themselves.
Within get... methods, resolve
should be called to ensure that the object that is being requested has
been completely loaded from the object store. This is required as each
object is stored independently using soft references rather
than as one large object graph.
Role.java

import org.nakedobjects.object.AbstractNakedObject;
import org.nakedobjects.object.value.TextString;

public class Role extends AbstractNakedObject {
  private final TextString name = new TextString();
  private Employee employee;

  public TextString getName() {
    return name;
  }

  public Employee getEmployee() {
    resolve(employee);
    return employee;
  }

  public void setEmployee(Employee employee) {
    this.employee = employee;
    objectChanged();
  }
}
Project is more complex in what it contains, but is
actually simpler to code. As a project involves many roles the
Project object will need to store a number of
Role references in some kind of collection. To create a
collection field that is a composite part of the object, we
make use of the InternalCollection class provided by the
framework and declare it as private and final. To initialize the
collection we create a new object, specifying the type of objects it is
allowed to hold (Role objects) and a reference to the
object that it belongs to (this project). As with the composite
TextString, this field only requires a
get method (in fact, as it is marked final a set method
would not compile).
As for the two previous classes the Project should
also have a name field and this is added as before.
Project.java

import java.util.Enumeration;
import org.nakedobjects.object.AbstractNakedObject;
import org.nakedobjects.object.collection.InternalCollection;
import org.nakedobjects.object.control.About;
import org.nakedobjects.object.control.ActionAbout;
import org.nakedobjects.object.value.Case;
import org.nakedobjects.object.value.TextString;

public class Project extends AbstractNakedObject {
  private final TextString name = new TextString();
  private final InternalCollection roles = new InternalCollection(Role.class, this);

  public TextString getName() {
    return name;
  }

  public InternalCollection getRoles() {
    return roles;
  }
}
In addition to the two fields that this object offers we will add the
following method, which will be made available to the user from the
object's pop-up menu. This method is simple: it creates a new
Role object; sets the name field
using a text value; and then adds the new role to the project's
roles field. It ends by returning the new role
object, which, when invoked thought the graphical interface, will result
in the new object being displayed. (Admittedly, this method is somewhat
superfluous, but it does demonstrate how easy it is to offer object
behaviour to the user.)
  public Role actionAddProjectLeader() {
      Role projectLeader = (Role)createInstance(Role.class);
      projectLeader.getName().setValue("Project Leader");
      roles.add(projectLeader);
      return projectLeader;
  }
The above method, however, is only suitable when no
project leader has been assigned already (as will be the case before the
method is first invoked). Methods like this can be controlled by a
corresponding about... method. An
about... method must return an About
object, which can be queried later to determine whether the menu
item for the action method should be disabled or
not.
The method below is matched to the
actionAddProjectLeader method by its similar name. When
invoked, the collection held in the roles field is
iterated through. If one of its Role objects has the name
'project leader' then an About object - hardwired to disable
the option - is returned. If none of the roles match, then an
About object - hardwired to enable the option - is returned
instead. Both of these objects are retrieved from the
ActionAbout class.
  public About aboutActionAddProjectLeader(){
      Enumeration e = getRoles().elements();
      while(e.hasMoreElements()){
	  Role role = (Role)e.nextElement();
	  if(role.getName().contains("project leader", Case.INSENSITIVE)){
	      return ActionAbout.DISABLE;
	  }
      }
      return ActionAbout.ENABLE;
  }
Before we can compile and run the application we have to implement
the title method for each class. Then when the objects
are displayed they will each have a distinct title allowing the user to
distinguish each object from the others. Each of the objects we have just
defined has a name field which we will use as the title for
each object by adding the following code to each of the three classes. To
implement the title method we must return a
Title object, and the easiest way to get a suitable
Title object is to ask another Naked object
for one. We do this here by asking the name field
for its Title object.
  public Title title() {
     return name.title();
  }
The Title class is part of the main package and needs
to be imported.
import org.nakedobjects.object.Title;
The resultant three classes are as follows, and should be saved in
the project directory:
Project.java


import java.util.Enumeration;
import org.nakedobjects.object.collection.InternalCollection;
import org.nakedobjects.object.AbstractNakedObject;
import org.nakedobjects.object.Title;
import org.nakedobjects.object.control.About;
import org.nakedobjects.object.control.ActionAbout;
import org.nakedobjects.object.value.Case;
import org.nakedobjects.object.value.TextString;

public class Project extends AbstractNakedObject {
  private final TextString name = new TextString();
  private final InternalCollection roles = new InternalCollection(Role.class, this);

  public TextString getName() {
      return name;
  }

  public InternalCollection getRoles() {
      return roles;
  }

  public Role actionAddProjectLeader() {
      Role projectLeader = (Role)createInstance(Role.class);
      projectLeader.getName().setValue("Project Leader");
      roles.add(projectLeader);
      return projectLeader;
  }

  public About aboutActionAddProjectLeader(){
      Enumeration e = getRoles().elements();
      while(e.hasMoreElements()){
	  Role role = (Role)e.nextElement();
	  if(role.getName().contains("project leader", Case.INSENSITIVE)){
	      return ActionAbout.DISABLE;
	  }
      }
      return ActionAbout.ENABLE;
  }

  public Title title() {
      return name.title();
  }
}


Role.java

import org.nakedobjects.object.AbstractNakedObject;
import org.nakedobjects.object.Title;
import org.nakedobjects.object.value.TextString;

public class Role extends AbstractNakedObject {
  private final TextString name = new TextString();
  private Employee employee;

  public TextString getName() {
      return name;
  }

  public Employee getEmployee() {
      resolve(employee);
      return employee;
  }

  public void setEmployee(Employee employee) {
      this.employee = employee;
      objectChanged();
  }

  public Title title() {
      return name.title();
  }
}


Employee.java

import org.nakedobjects.object.AbstractNakedObject;
import org.nakedobjects.object.Title;
import org.nakedobjects.object.value.TextString;

public class Employee extends AbstractNakedObject {
  private final TextString name = new TextString();

  public TextString getName() {
      return name;
  }

  public Title title() {
      return name.title();
  }
}
Having defined our business objects we should set up some icons and
write a simple class that will make these classes available to the user.
The icons are used to represent our objects on-screen and are just
images, stored in files, that the framework can display. Each image file
name is based on the name of the class and the file itself must be
located in a directory called images and should have an
extension of .gif.
To set up the icon images for this application, create a
directory in the project directory called images.
Then copy six suitable images, from the icon-library
directory in the nakedobjects0.8.0 directory, into the new
images directory and rename them. The filenames given, must
correspond to the names of the classes with an image size appended
(16 or 32 pixels).
The suggested images are HouseUnderConstruction,
Hammer, and Man. These should be renamed as
Project, Role, and Employee
respectively. For example Hammer16.gif will become
Role16.gif and Hammer32.gif will become
Role32.gif.
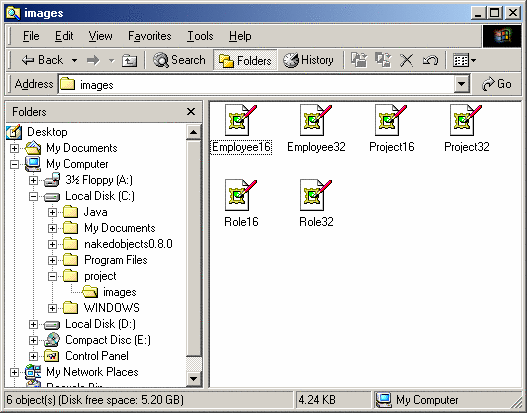
The window below shows the new directory with the six new image files within it.
In Unix the cp command can be used to copy and rename
each image file, as shown below:
mkdir images
cd /nakedobjects0.8.0/icon-library
cp HouseUnderConstruction16.gif /project/images/Project16.gif
cp HouseUnderConstruction32.gif /project/images/Project32.gif
cp Hammer16.gif /project/images/Role16.gif
cp Hammer32.gif /project/images/Role32.gif
cp Man16.gif /project/images/Employee16.gif
cp Man32.gif /project/images/Employee32.gif
To show these classes in a test environment we need to write a simple class that will load the framework, set it up, and then make the classes available to the user. Please note that this class is used only to test our application; when we make the application available to the end user it is setup differently.
The following class is used to load our three classes into the framework, which will then make them available to the user.
Run.java

import org.nakedobjects.Exploration;
import org.nakedobjects.object.NakedClassList;

public class Run extends Exploration {
    public static void main(String args[]){
	new Run();
    }

	public void classSet(NakedClassList classes){
	 classes.addClass(Project.class);
	 classes.addClass(Role.class);
	 classes.addClass(Employee.class);
	}
}
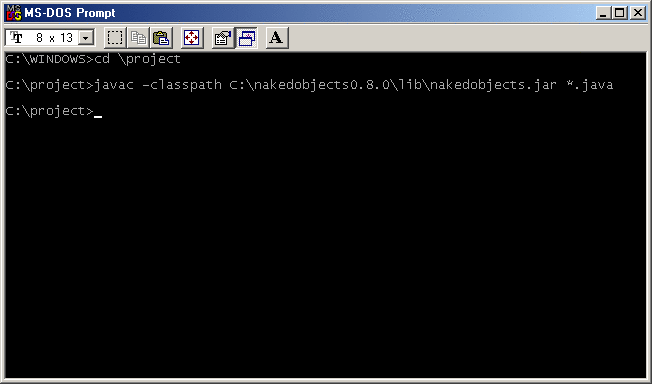
To compile both the business object classes and the
Run class we need to invoke the Java compiler, specifying
the framework library (nakedobjects.jar) in the classpath.
(Remember that the directory name used, due to the version, could be different.)
To do this under Windows, start an MS-DOS window and enter the commands as shown below.
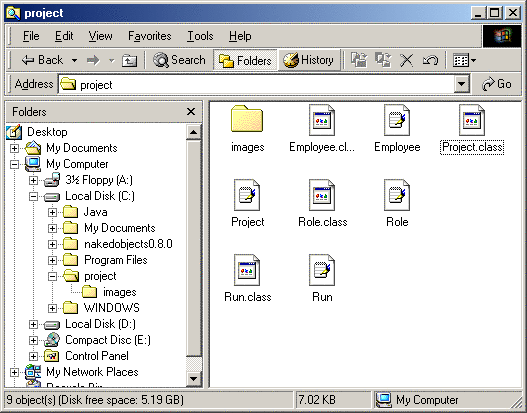
After this the project directory should contain the
.java and .class files and the
images directory as shown below.
In Unix the command is very similar:
javac -classpath /nakedobjects0.8.0/lib/nakedobjects.jar:. *.java
Listing the files shows the same set as in Windows:
Employee.class
Employee.java
Project.class
Project.java
Role.class
Role.java
Run.class
Run.java
images
To run the application (the Run class) invoke the Java
Virtual Machine (JVM) from within the project directory.
The classpath must refer to the framework, the Apache Log4j library and
the current directory where your class files resides. For Windows:
java -classpath
		c:\nakedobjects0.8.0\lib\nakedobjects.jar;c:\nakedobjects0.8.0\lib\log4j.jar;.
		Run
(This command should all be on a single line.)
And in Unix:
java -classpath
		/nakedobjects0.8.0/lib/nakedobjects.jar:/nakedobjects0.8.0/lib/log4j.jar:.
		Run
(This command should all be on a single line.)
A small window will appear with the three classes showing. The following screenshots show these classes in use.
1. The classes window pops up showing the three classes we specified:

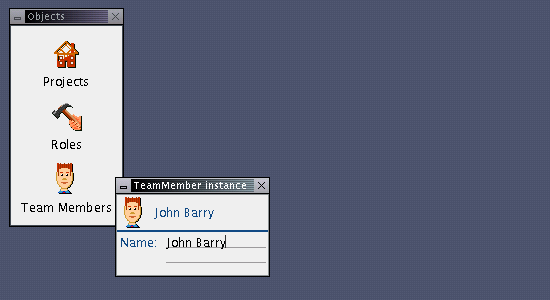
2. Right-clicking the Employees class and selecting New Employee... creates a new employee object:
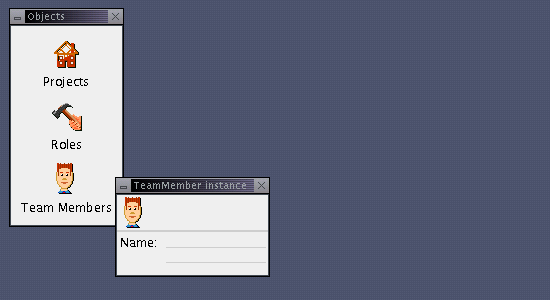
3. Entering a name into the Name field gives the
object a title. The title, as defined by the title()
method returns the value of the Name field:
4. Similarly, right-clicking the Roles class and
selecting New Role... creates a new role object:
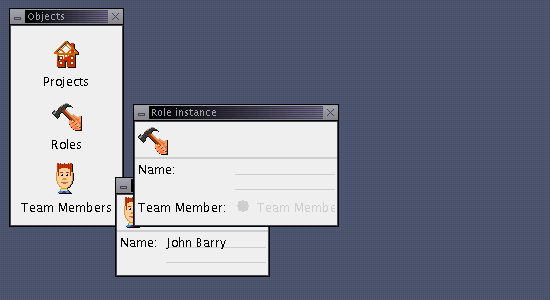
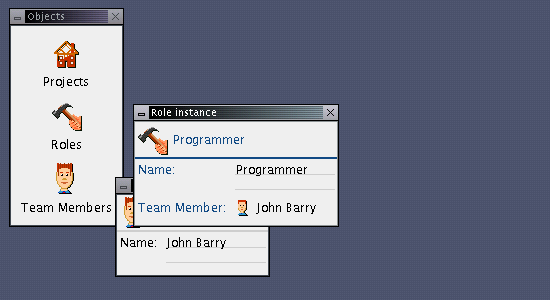
5. Entering a name into the Name field also gives the Role object a title:

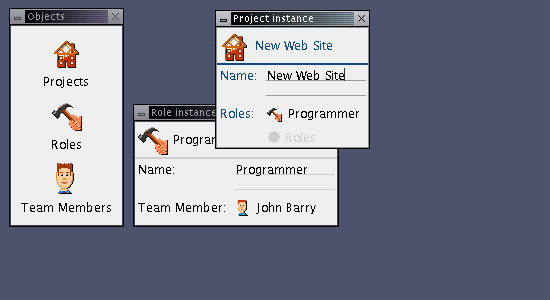
6. Now dragging the employee John Barry onto the Employee field sets up a relationship between the two objects: the role knows the employee:
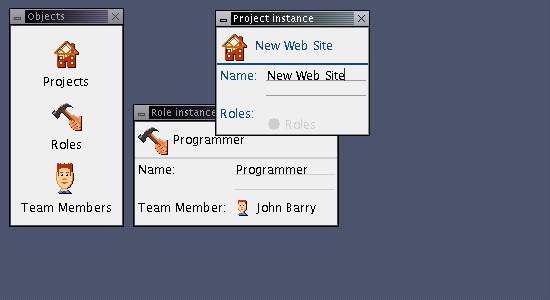
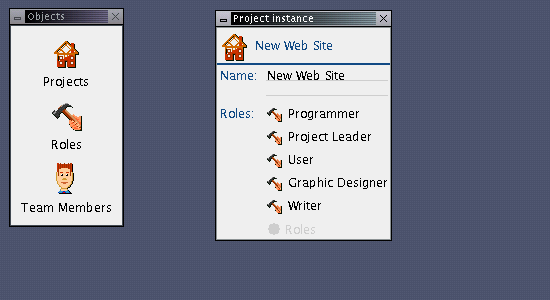
7. As discussed a project is the normal starting point and here one has been created and a name assigned:
8. Dragging the Programmer role onto the Roles field adds our programmer to the project:
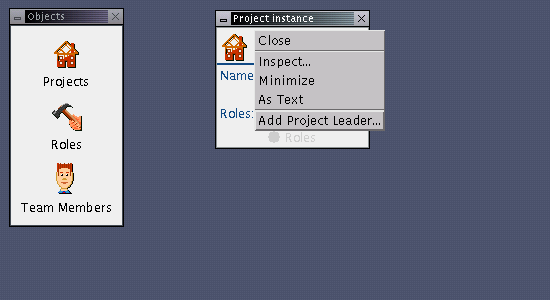
9. Right-clicking on the Project object shows the action we added: Add Project Leader...:
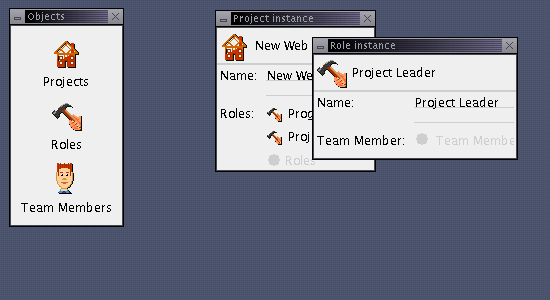
10. Selecting that option creates a new Role object, labels it 'Project Leader' and adds it to the Roles field:
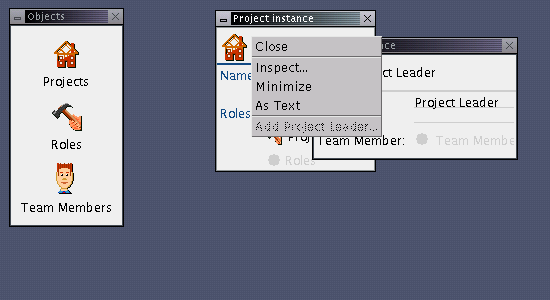
11. The same pop-up menu now shows the option as disabled as the about method found a role containing 'project leader':
12. The final state of the project once all the roles have been added:
Copyright (c) 2002 - 2004 nakedobjects.org
You may print this document for your own personal
use, or you may copy it in electronic form for access within your
organisation, provided that this notice is preserved.